Hanging Herb Garden
- Feb 23, 2019
- 3 min read
Welcome folks! Another week and another challenge accepted! ...and met! Actually, it was a long time a-coming, herb are always around my home, whether in various pots scattered around the kitchen or in the railing-mounted baskets my dad fabricated for me, I always have fresh herbs available. Face it, dried herbs are just NOT the same!
My staples are rosemary, which I have in the garden as it last forever, can be shaped, looks beautiful and gets used a LOT! Basil, parsley, chives, oregano, thyme and coriander... oh, and lavender and aloe.
Sometimes I use up my plants before they can become established and have to re-buy, Other times, like with basil mostly, the plant just ages and dies. It happens. Moving on...
This week's theme was Herb Garden, which with all the other DIY Reno's we've been busy with, just haven't been a priority, so aside from the random pots around the kitchen I haven't given much time to.


A while ago, Ramona of Ruffles & Rust and I collaborated on a patio makeover for a client where I brought their table home, ripped off it's old boring square legs, put new legs on, removed the top, turned it around and painted and stained it.
We built faux beams to add come country charm to the space and made some floating shelves to flank the feature mirror. I also made two of a smaller version of my herb hanger for either side of the archway for her to put small succulents into. All wood was stained a beautiful light grey.
Ramona came in and added her decorators magic with soft furnishings, new chairs, gorgeous mirrors (one of which was made a wet bar with a cupboard built behind it) and styled it for the client.
It is a stunning transformation!


I'm going to tell you exactly how I made these plant hangers, in fact, I'll show you. I'm not going to lie though, if you aren't good with power tools, rather don't attempt this.


Starting off with pots from around the yard, I painted them white, as you can see in the top left, when the terracotta absorbs water it bleeds through and gives a fantastic aged look. I had some left over plywood from a previous job and used this for my shelves, measuring them with the 13cm pots and adding 5cm around the edges. I marked the 15mm from the corners and marked the centre of the pot and drilled 6mm holes for my 5mm rope. Using the jigsaw I cut the holes for the pot to sit inside, deducting 2cm so that the lip would fit above. I sanded the edges and sealed the wood with a water based varnish which is so easy to use and does it's job well!


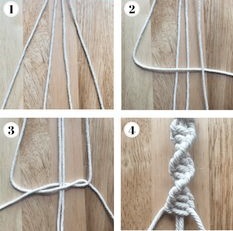


The macrame knot is stretched out from the weight of the plants but is based on the twisting square knot. I used a large key ring for the hook and start of the rope.

There you go! Hanging Herb Planter! What I did before I put the plants in the pot is put plastic wrap inside to prevent too much water escaping. Only when the plant has soaked up its fill the water then drips out a much smaller hole into the plant below it, etc etc. Herb love lots of water, so this step was necessary!

We've put this hanger next to the back door which is a few step outside the scullery, it totally makes sense to have herbs as close to the kitchen as possible. I had even considered hanging it inside, but after seeing the length, I thought better. It now ties in the look of chipped white paint on the small patio area which after losing the cafe table and chairs to my secret garden, houses the old wooden lounger chair I literally picked up on the side of the road! It needed a new base and still need permanent cushions, but I'll get to those...

Don't forget to visit my Romancing the Home counter parts to get more tips and ideas for housing and caring for your herbs!
'Till next time!
Happy Herb Hanging!


Comments